FACEBOOK

Pages

Thursday, December 31, 2015

Our Families D.I.Y. Laundry Soap


I have meant to blog about this ever since I started this blog, just have not gotten to it until today.  I have been using this soap for a little over 2 years now, and we love it!  I did many internet searches, Pinterest searches and this is what we ended up putting into our homemade laundry soap. 

For a double batch of soap that usually last our family of 6 anywhere from four to six months depending on how much laundry we have.  We go through more in the warm months due to camping, riding ATVs in the mud, etc. The ingredients this time were about 50 dollars it would have been less if I went to Sams Club, but I did not have the time today.  Even at 50 dollars for 4-6 months probably more toward six months, it is still cheaper (and better working in my opinion) than the Tide I used to buy.
                                       
                      Here is a list of the ingredients for a double batch:
                                   6- Bars Fels-Naptha Laundry Soap  
                                   1- 7.22 lb.  Oxi Clean         
                                   2- 3 lb.  Boxes Laundry Booster Super Washing Soda
                                   2- 4 lb. Boxes 20 Mule Team Borax
                                   2- 4 lb. Boxes Pure Baking Soda
                                   1- 19.5 oz. Downy UnStoppables (I use Fresh Sent)
                                   1- 13.2 oz. UnStoppables (I use Fresh Sent)

The first and most time consuming part of making this laundry soap is grating the Fels-Naptha soap bars, I have been making this for over 2 years and still use the same hand held cheese graters I bought at the dollar tree specifically for this purpose.  


Fels-Naptha before you grate it


Fels-Naptha after you grate it, it will look like grated cheese...just do not eat it!

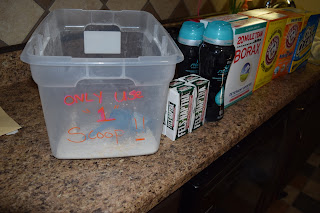
Once you have completed grating the soap bars, I open all my boxes and get my laundry soap container ready, which is a 20 quart container.


Then I start layering the ingredients, this helps make sure I have everything equally distributed.  For example I do a box of borax, than a layer of grated soap, a box of baking soda, a layer of soap, than a layer of Downy UnStoppables, and so on.  

You can sort of see how I layer my ingredients.
Once I have it all in my container I mix it, and the most efficient way I have found to work is to just use my hands making sure I get all the way to the bottom of container.  I just keep mixing it until I think everything is mixed evenly.  I than use a scoop from a smaller container of Oxi Clean, I do not use the large one that comes in the 7.22 lb. box.


I use the small scoop from a small container of Oxi-Clean, and use 1 scoop per load
This is how I make our families laundry detergent, I do not have a High efficient washing machine, so I cannot say if this will work in one.  What I can tell you is I have four kids, two boys, two girls, and a Husband that has a very dirty job and this stuff works great!  I have not gone back to store bought laundry detergent in two years if that tells you anything.  I hope this helps you, and enjoy, let your kids help make it.  My little boy helped today he only grated half a bar of soap to my 5 1/2 bars of soap, but he was excited to help mom!

My little helper, he really liked helping make our laundry soap, he also really likes to put 1 scoop in and help with starting the laundry too!


Friday, July 24, 2015

This Really Happened!

D.I.Y. oil change and tire rotation…


It was over do for my oil change and with four kids, work and everything else my husband had not gotten to it.  It was driving me crazy because I knew it needed done, but with my husband’s busy work and his never ending to do list he just didn’t have time to get to it yet.  I decided it couldn’t be that hard, right?  First I had to do some reading up on it, I did not even watch a YouTube video which is huge for me!  I found this very clear page with great instructions and off I went (after getting my husband to agree to it ha-ha).
First my husband and I went to the automotive store (with a couple kids) and got the oil and filter my car needed.  We got home and I went to change in some work clothes than I was ready to go (with my husband sitting back watching in case I screwed up to bad).  First things first I had to jack up the car and put it on jack stands, you really have to lay on the ground to figure out a good place to put the jack, so you have a good place to put the stands.  Alright once the jack stands are in place and you are confident the car is not going to smash you it’s time to get dirty (in my case very dirty).   First I found the socket and wrench I needed to loosen the oil drain plug…after getting the oil drain pan under the car I laid on the dirty garage floor and got to it. 


 Well let me tell you that plug was so tight after several times I finally let my son help loosen it, so there I was unscrewing it by hand now I get the pan situated under the stream and once I get the bolt out….the oil starts shooting out like two feet from where I had put the drain pan! I tried to move it as quickly as possible but by the time I got it under the stream there had to be at least a quart or two of oil on the floor (insert crying face here) so while it was draining I started the cleanup affords.  I was really focused on cleaning up the oil when I looked over and noticed the damn oil was now draining a foot in front of the drain pan (laughing at the situation is better than crying).  Ok once the oil was done draining mostly, I wiped of the drain plug with a clean rag and put a new washer thing on it, than in it went (thank gosh that part was over).  Well I took a few minutes to clean up the extreme oil mess, than I got a different oil drain pan since there was oil in and on the other one (a lot of oil) I mean next time I do this I am using a container that goes under a bed for storage!  Time to take the filter off that was pretty easy took it off and dumped it upside down in the drain pan and cleaned up around where it had been.  Now I had to scoot out from under the car again to get the clean filter and put clean oil on the gasket, back under the car I got that sucker on and cleaned up some more!  By this point I am a hot sweaty mess but the show must go on, right, right!  Ok than since the car is already jacked up I had to rotate the tires. 

I had to find the right socket and wrench thing and got to work and let me tell you this was my husband’s favorite part, at least he sure was laughing A LOT!  Getting those lug nuts off with just a regular old socket thing and not the air tools took some effort!   On the last tire I got all the lugs off and no matter how much I pulled on it I could not get it off…so I swallowed my pride and asked my husband to help… all he did was tap it with his foot and the damn thing fell off, I really wanted to hit him with the wrench at this point! At this point my husband is laughing pretty hard, well I got all the tires rotated tightened the lug nuts, time to lower the car.  May I suggest when lowering it do it slowly so it does not scare the crap out of you. The last part after having the car lowered was to poor the new oil in and check the level with the dip stick, and there it is I did it!!  I changed my own oil and now if my husband is busy I have the skills to do it myself! Hopefully next time it will not be as messy since I know that the oil shoots out differently depending on the amount of oil still needing drained.  also I really plan on using a huge storage container one of the long ones that go under beds that should cover the whole area of drainage!  

And if you happen to do this to your husbands garage floor (insert laughing face here) just get a bag of unmixed cement, poor a few cups of the dry mix on it and sweep it around.  It will soak up the oil so there is not a big stain in the garage and so your husband will let you in his garage again.


Friday, July 17, 2015

My Awesome D.I.Y.

It is a desk, a Homework station, and a laundry basket station Oh my!!


So today I was cleaning and as I got to my dining room and looked at our piled high computer desk, I thought damn I need to fix this!    As I stood there trying to figure out what I could do to prevent this from always happening I decided to make a custom desk!

First I decided I wanted this to not only be a desk, I wanted it to be a HOMEWORK station!  I have four kids and they usually do homework at the table…which aids in us never eating at our table. As I was measuring the space I decided this could double as laundry basket storage (I had made one in the past but do to moving things around in the laundry room we could no longer use it where it was).
my old laundry basket holder

After measuring my space I drew out what I wanted to do, than off to Lowes I went.
First I went and looked at the items I needed, figured out exactly how many of each board I needed and loaded them on a cart.  Then I found the Lowes employee to cut my boards, this way they are all the right length!
my drawing for my project
thanks for the perfect cuts!


You don’t have a truck don’t worry! This all fit into my little Honda!
who needs a truck when you have a Honda civic haha


Once I was home I wanted to spray paint the legs but didn’t want to spend much time doing it.  I found an old 2x4 and screwed each leg to it and started spray painting (I used a grey color with primer in it).
fastest way to spray paint 16 desk legs

After that I carried the rest of the wood and items inside which allowed the legs time to dry.  I unscrewed the legs from the 2x4 and got to work, I first screwed four legs to the biggest piece of wood and positioned that where it would sit.  Then I picked the next top piece and laid it on top of the other board and traced the angle I needed to cut, I did this same process for the other angle as well.  I cut these with a Dewalt cordless circular saw.  After installing the legs and putting liquid nail between the angles and attaching all the pieces together I got to work on the basket slots.  I bought smaller boards to slide the baskets over, we can fit a total of 6 baskets(one basket per bedroom and one for my crochet projects).I just attached these to the legs and it was ready for baskets.  The top I just covered in contact laminate paper.
no safety glasses or shoes for this d.i.y. er, whoops! don't try this at home without safety gear!
AMAZING


I bought a three drawer container which I put lined and graph paper in one drawer, printer paper in another, and the last drawer is for miscellaneous desk stuff. The top of the drawer thing is divided to hold other supplies.  I also bought 2 bins to hold pins, pencils, scissors, and a ruler.
So for about $42 dollars at Lowes and about $30 at Walmart in some supplies and mostly accessories,  I have a awesome desk/homework station/laundry basket station!  
The kiddos love it!!


Thursday, July 16, 2015

Trying to get back in shape!


Alright I am at my highest weight I have ever been in my life (insert crying face here).  I have gone through several emotions as my weight has fluctuated… mostly frustration with having to work so hard to get what seems so easy for some!  I long to look in the mirror and see a better me.

So here goes nothing! 

I started walking on my treadmill this week (after taking all the laundry piles off of it-haha).  Now the problem with this is I get the worst shin splint in my left leg!  I have tried so many things stretching, different shoes, shoe inserts, compression sleeves, anti-embolism socks, medication, muscle rubs, and today I tried compression socks.  I did not want to spend a lot of money on the socks in case they did not work, like so many other things I have tried!  I found these socks at Walmart for under 15 dollars.  They are ACE brand compression running socks and were in the sporting good section, since they only had men’s sizes I got size small.  I started walking Tuesday without any thing on my leg, made it to 20 minutes and my leg was killing me!!!  Wednesday I tried the anti-embolism socks, made it 28 minutes and my leg was killing me!!!!  Today I wore the Ace compression socks…at about 13 minutes my leg was feeling a little crampy so I stopped and stretched (I also did this the other days).  After stretching I got back on the treadmill and my leg was still a bit bothersome but not like the other days, after 28 minutes of walking something amazing happened the cramp relaxed and it was like a magical moment in my life (haha), and ya know what I walked on the treadmill for 1 whole hour and probably could have kept going!!!  So these socks were well worth the money, and I will be looking for a ladies version of them online!
Update:just found and ordered the socks on walmart website!

http://www.walmart.com/search/?query=ace%20running%20socks


So if you have any trouble with shin splints keep trying different things, what works for one person may not work for another…it truly is trial and error until you find the right solution.

look what got here and the worked great!


Saturday, July 11, 2015

Working On My Blog!!

(Check out this font, I downloaded it off the internet for free!!!!)


I am very new (brand new) to the whole blog thing.. So I am learning as I go.  
The First thing I did was ask a friend for help, which  lead me to this blog site.  Than it was time to pick a blog name (not as easy as it sounds!) There are ready made templates on this site, none that really fit my personallity though... So to make my blog reflect me I bought my template off Etsy, the designer was awesome answering and helping with all my questions.  So than I started to blog, at first I was  having trouble deciding on what to write about, but I decided just to blog about the things I do in my everyday life.   Since I noticed most of blogs I read also have corresponding Facebook pages I set one up, I was able to buy the facebook cover page from the same designer off Etsy.   
 I keep learning more everyday so bare with me.  All though I have a lot of more to learn as I dive into the world of blogging,  I feel positive that along the way I will figure it out!

I keep seeing all this cool font,  so I went to google and found a website, http://www.fontsquirrel.com/, and downloaded a few different fonts . 


Tuesday, July 7, 2015

Tie-Dying is EASY!!


Well I went camping over the fourth of July and we decided to tie-dye...
Tie-Dying is pretty easy and its always fun to see how your items turn out!!
You can get white t-shirts in packs or 3,5,6, or 8 fairly cheap, and I have done boys underwear, socks, sheets, etc. just use your imagination!  Once you have your items you need to fold them depending on how you want them to look.  You can get ideas on Youtube, and pinterest, here is one link I used, it shows how to dye a ying yang sign: https://www.youtube.com/watch?v=s2qcR2GVMag. So Step one fold your shirts:.
 So Step one fold your shirts:
There are so many different ways to get different designs!

For the most Part we use kits like this that we purchase at Walmart, but can be purchased at craft stores.
The Tulip Kit includes bottles to mix the dye in, the dye, rubber-bands, and gloves (but I use different gloves)  The last time I purchased a few of these kits and saved the bottles, so this time I was able to purchase just the tulip dye at Walmart.
I needed some additional colors that were not available in the Tulip brand so I had to purchase a few Rit dyes, located in the laundry aisle at Walmart.
Don't forget to wear gloves and if you don't want stained hands, get thick gloves and toss the ones from the kit!
Once you are done with each item you can wrap it in saran wrap (which is a pain to take off) or you can put it in garbage bags and tie (I zip tie) between each item,I can fit about three shirts per bag.

After your items sit in bags for 8 or more hours (the longer you let them soak the more the color holds) than throw them all in the washer without soap, and than dry.  Do not FREAK OUT when the washer looks like this, it will be fine!

Alright all the hard work is done, time to check out some of your masterpieces(insert excited face here)!
My daughter will not take a nice picture for me sorry guys!
Check out these rainbow friendship shirts! I will start the rainbow at the bottom of the shits next time that way the highest point lands before the sleeves, but I still love them!

There will be items that don't turn out...

It is okay, you can redo them!
Just fold those items back up and start over!

This shirt was one that I folded up on a cut up swim noodle, I believe its call shabori?, but I love the vertical lines it made, but the rest of the shirt ended up with no other color!  So note to self when doing that fold on the noodle make sure the die absorbs in all of the fabric.  What I did to fix it was just tie it up to add horizontal lines and now I like the final look!

So just get some shirts, they can be white or colored and get your tie dye on!  There are many different designs to try, I have done hearts and Ying Yangs, so don't be afraid! You won't regret it and you will have some pretty neat, one of a kind items. 


Thursday, July 2, 2015

Mom I'm Hungry...

Whats for Dinner tonight??

My kids are known to ask me this question as soon as they are leaving for school, and repeatedly during the day(it drives me kind of nuts)!  So  when grocery shopping this week I decided I wanted something different this week, with our schedule our meals can be very predictable!  I decided to cook up some lasagna tonight and not the kind from the freezer section that takes an hour to cook!  When I cook something like this that takes a bit more effort and time I make enough for left overs the next day and a freezer meal for the future!

I bought disposable pans that way I can  just wrap it  in saran wrap (many times before freezing) in the  pan to recook later! These pans are pretty large I purchased them  for under three dollars at Walmart, 11.5 W x 3.5 D x 19.5 L. These are big pans but  work well for my big family.

 I bought most of my ingredients besides the ricotta cheese and noodles at the Sams club,and just  ran to Walmart for those few items.  I just cook up five pounds of ground beef, drain that and sit it aside.  Than I mix the cheese mixture two 32 oz. ricotta cheese containers , one large 32 oz. cottage cheese container, five eggs, and four cups  shredded mozzarella and mix well.  Than I just layer the meat, the sauce, and cheese, plus additional cheese according to the directions on the oven bake lasagna noodles.  Probably the only things I do differently than the box says is I do not add Parmesan cheese to the cheese mixture I just sprinkle some on each layer of the lasagna as I go, and I do not mix the meat with the sauce because mixing the sauce/water with the correct ratio already takes a lot of room!  If you are looking to have a yummy dinner tonight and sometime later in the future this is a pretty easy idea, because making two pans takes about the same time as it would to make one pan.  

Wednesday, July 1, 2015

Redecorating my daughters bedroom on a low budget


Last summer my oldest daughter and I redecorated my youngest daughters room. My oldest daughter had her second knee surgery that summer so she didn't have much choice but to help, she was stuck with me(insert evil face here).   First I picked a very dark blue, her room is a good size and we painted two walls the dark blue and two walls a light grey that I had left over from a different project.  Then on to the projects to hang on hers walls and such. 

 First my daughter worked on a spoon mirror:


For the backing we used a piece of cardboard my husband had, we put painters tape across the cardboard to divide it into sections.  Then the spoon breaking took place, we used sharp scissors and got cutting.  Once we had a good amount of spoons to start with we  began hot gluing the spoons around the outside of the circle and once we were to the center we glued the mirror in the middle.  It took a lot of hot glue and a lot of spoons!  Once all the spoons were on we painted it darker pink in the center to lighter shades of pink as we went out.  Once it was dry we screwed it to the wall.  I love it!

Another project we did was owl decor with hooks(my daughter is crazy about owls), we had a bunch of boards left over from doing windows so we just cut a rounded part of the top leaving the points for ears.  Than we got to  painting and adding painted washers for eyes. Than I added hooks to the bottom.  Another project that turned out so cute!

Another easy fix I did was upholsterer her vanity seat.  I bought a yard of fabric and unscrewed the seat added the fabric stapled it on the bottom and screwed it back down and HELLO what a transformation!

I also used some left over wood to add her name above her closet.  I picked out a piece of scrap book paper for each letter, got some cheap wood letters, painted the letters and let them dry while I added the paper. To add the paper I simply sprayed adhesive on the boards and than placed the paper on them.  I than had to figure out how to hang them so I just drilled a hole the size of a screw head in the back without going completely through the bard.  Then we glued the letters to the scrap paper and another project was done.
Lets see we also tried to organize the queen of mess's closet a bit. We had some left over metal shelving stuff from our pantry so we added a shelve to put her shoes on than we made some cute hangers from wire hangers to hang sandals and slip on shoes from. We also put some screws under her high shelve to hang bags from.  For not spending any money on this project it was a good solution to an on going problem! Don't mind the messy floor in the picture we were taking pictures as we finished projects, keep in mind we had to clean the closet first(insert mad face here).
Another one of my last minute ideas was a shelf to put sports stuff on.  Our daughter plays sports and although she has some trophy's she mostly has those medals on ribbon which were all in a messy pile on her vanity.  That pile had me thinking how am I going to display those... so again with materials we had laying around: a two by four and some trim. I measured above her desk that we also painted, and decided on the length and got to work.  My son helped me with this one we used a miter saw to cut angles on the trim so the corners fit together.  There is a two by four we screwed to the wall after making sure it was level than screwed another to the top of that, this is the shelve, than we put the trim around to hide the ugly two by fours.  I painted it all white screwed hidden screws to the board that is screwed to the wall to hang the medals from and another project was done!
I also made curtains, just bought fabric at a craft store with there everyday 40% off coupon and whipped these up which add a great pop of color! I just added a 1/4 hem to the sides and a 2 inch rod slot to top and finished the bottom off with a 1 inch seam.   Very Easy do it yourself curtains.


She loves her room and although we added new windows and painted the walls, everything besides the fabric we used to upholster the vanity and make the curtains and the hooks for the owls, we had all the supplies on had.  With ideas we got mostly off of  pinterest and our own imagination we created a fun room on a very low budget!
Excuse her face(insert laughing crying face here) she cannot take a serious picture, but that face I think means check out my Awesome cool room!